 | English
| Deutsch
| English
| Deutsch
FED1+, FED5: Produce spring utilities mandrel and bore with 3D printer
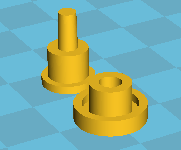
Shaft and hub with mandrel and bore, generated as STL file and produced with 3D printer, can be used for a test assembly of the spring and compression up to spring length L2.
FED17 - Print mandrel and sleeve for magazine spring
Mandrel and bore for magazine springs can be generated as an STL file and produced with a 3D printer now.
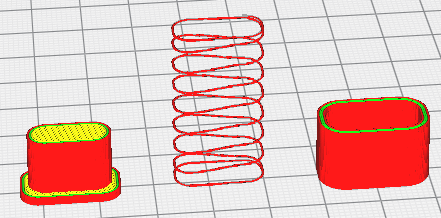
You can also enter the setting length under "Edit \ Production drawing" in FED17 now.
FED1..17: Warnings for fatigue strength diagram for hot formed springs
In EN 13906, there is only one fatigue strength diagram for hot coiled springs: for hot rolled steels according to EN 10089 with ground or peeled surface, shot blasted. Unlike cold-formed springs, the spring is fatigue strength safe in 2 million cycles, not 10 million like cold-formed springs. Conversely, a shorter life is calculated from dynamic shear stress: If the allowable variation of stress for fatigue strength is slightly exceeded, then the life is not a little less than 10 million load ccycles, but less than 2 million cycles.
The fatigue 2E6 load cycling diagram does not automatically apply to hot formed springs and / or EN10089 spring bars, it must be configured under "Edit \ Calculation Method". There are now 2 new alerts as hint for possibly inappropriate setting:
Warning: EN10089 fatigue 2E6 if hot formed or material EN10089, but fatigue diagram 1E7.
Warning: Fatigue 1E7> <2E6? if cold-formed spring, but fatigue strength 2E6 set.
SR1/SR1+: Configure default material database
When selecting the materials for clamping plates and nuts, you can choose between the database files pressung.dbf, mat_p_1.dbf and mat_p_2.dbf. The default setting can now be configured under "Edit \ Calculation Method" (Default Mat). If you want to use a database with your own material data, the best way is to use mat_p_1.dbf. This contains material data from VDI 2230: 2003, which you no longer need. If you have not yet used mat_p_1.dbf for previous calculations, you can delete and replace the existing records, otherwise you may append your own data to the bottom. Mat_p_2.dbf contains the materials from VDI 2230:2015, and pressung.dbf contains all old and new material data.
ZAR1+, ZAR5, ZAR6, ZAR7, ZAR8: Helical gears by means of 3D printer
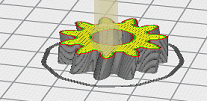
Up to now, only straight-toothed gears could be output as STL files for 3D printer production. This is now also possible for helical teeth. The helix is represented as a staircase function. Minimal stair width is the smallest possible layer thickness of the 3D printer. Suitable as an illustrative and functioning model, but rather unusable for practical use.
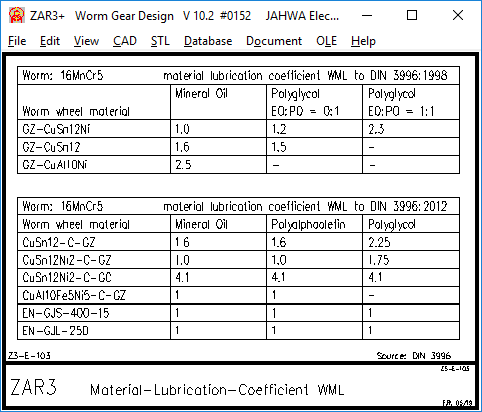
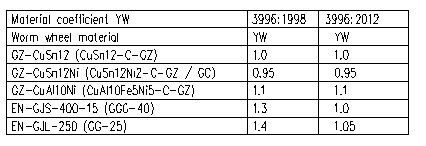
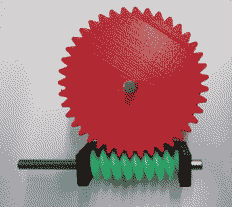
ZAR3+: Strength Calculation according to DIN 3996:2012-09
The strength of worm gears was previously calculated according to DIN 3996:1998-09. Now, the newer edition of 2012 has been integrated. ZAR3 + can now calculate strength and efficiency according to 3 methods: according to Niemann, according to DIN 3996: 1998 and according to DIN 3996: 2012. There were some changes on input:
- Polyalphaolefins were added to the lubricants
- Lubricant viscosity must now be entered for 40 ° C and 100 ° C, not for 50 ° C
- Enter the number of sealing rings for power loss PD
- Select the wear limit: 0.3 mx * cos (gamma m) or pointed tooth
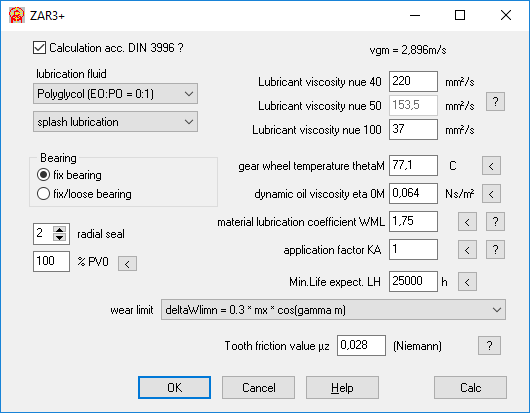
Some help pictures had to be supplemented and updated because of changed characteristics in DIN 3996: 2012.

ZAR3+: Tooth contact axial
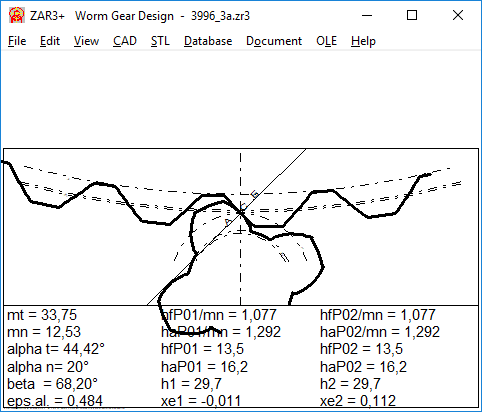
The meshing of worm and worm wheel can now also be represented in axial section in addition to the radial section. Also 1-tooth worms (ZI) are now displayed.
ZAR3 +: Worm gear model with 3D printer
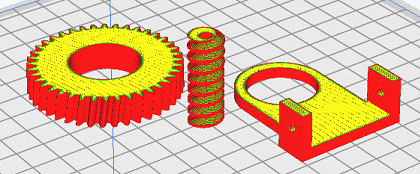
The calculated cylindrical worm can now also be output as STL file and create a model with 3D printer (ZI worm). The associated worm wheel can not be issued as globoide worm wheel, but at least as a helical gear wheel.
ZAR3+: bore and shaft for worm and worm wheel
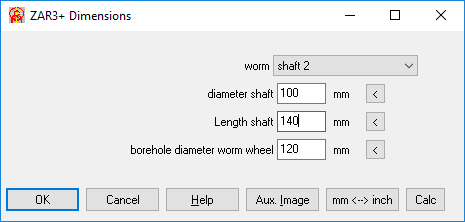
For worm and worm wheel you can enter a bore under "Dimensions 2". For the worm, it can be a shaft rather than a hole. "Shaft 1" is 1 shaft extension on the worm gear (for overhung bearing assembly), and "shaft 2" a shaft on both sides of the worm. The dimensions are used for STL files. When producing a worm with 3D printer, it is better to use only "bore" or "shaft1".
ZAR3+: factor for no-load power loss PV0
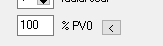
The calculated no-load power loss PV0 sometimes seems too high for small, high-speed worm gears. The calculated no-load power loss at drive speed above 1000 rpm is often higher than the driving power, especially if plastic worm gears are used and therefore the drive power must be much smaller than in steel / bronze gear pairs. Efficiency and output power are then 0, and strength calculation is not possible. In order to be able to continue calculating or to adapt the calculation to measured values, one can now enter a factor for the consideration of the calculated no-load power loss PV0. Default is 100%.
ZAR3 +: Input dm1 for recalculation
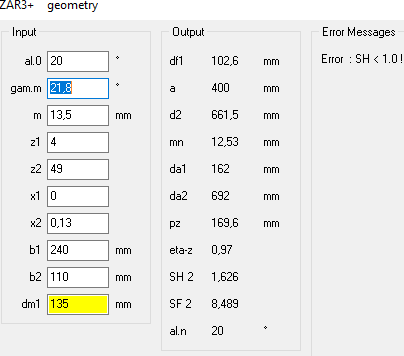
The mean pitch diameter is actually a calculated value. If you change dm1, the module has been adjusted so far. The module stays the same now, instead the helix angle gamma_m changes.
ZAR3 +: axial pressure angle of the worm alphax
The axial pressure angle of the worm alphax was incorrectly output (smaller than alphan instead of larger than alphan). This only had an effect on worm gears with ZA profile, because there is alphax = alpha0, and alphan is calculated.
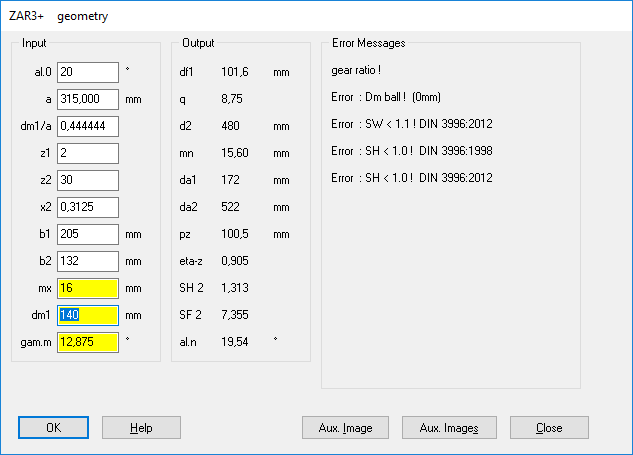
ZAR3+: Input mx at "Dimensioning" changes either gamma_m or x2
If you enter the module at "Dimensioning", dm1 and gamma_m are recalculated. If you want integers or standardized dimensions for m as well as for dm1, the profile shift x2 is calculated first. If -0.5> x2 <1.0, x2 is set, otherwise dm1 and gamma_m are recalculated as before.
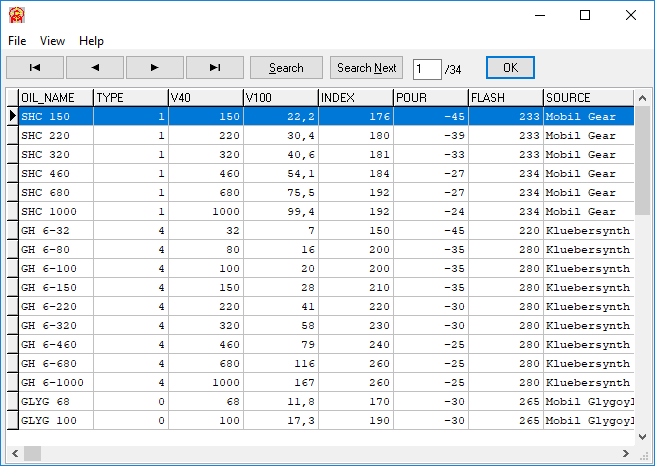
ZAR3+: Lubricant database
For entering the lubricant viscosity at 40 ° C and 100 ° C, there is now a small lubricant database as input help.
ZAR3+: Diagram a = f (gamma_m)
In the worm gear, gamma_m is the pitch angle of the worm and the helix angle of the worm wheel. The helix angle changes the center distance, or gamma_m (beta2) is calculated for a given center distance.
beta 2 = gamma_m
beta 1 = summa - beta 2 = 90 ° - beta 2 = 90 ° - gamma_m
a0 = mn / 2 * (z1 / cos (summa - beta2) + z2 / cos (beta2))
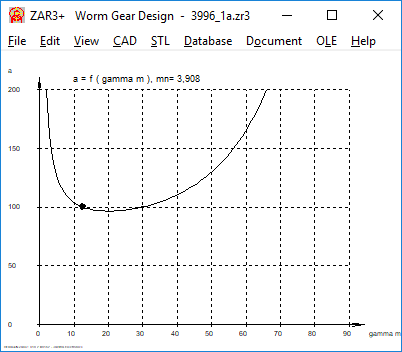
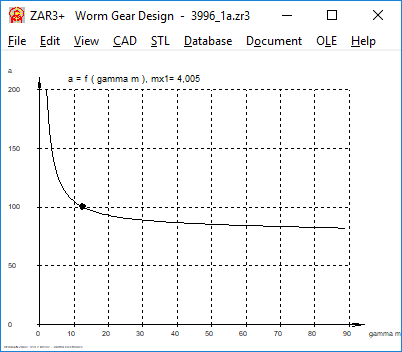
The function can now be represented as a diagram a = f (gamma_m), either for "mn = const" or "mx = const".
Diagram shows the smallest possible center distance, if mn remains constant. With worm gears, however, the axial modulus of the worm is normally specified, which corresponds to the tangential modulus of the worm wheel at 90 ° crossing angle (mx1 = mt2). Then mn = mt2 * cos (beta2) and
a0 = mx1 / 2 * cos (beta2) * (z1 / cos (summa-beta2) + z2 / cos (beta2))
ZAR3+ Diagram eta = f (gamma_m)
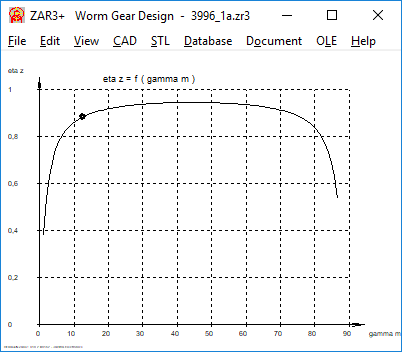
The efficiency is also dependent on the helix angle. However, you can not increase the helix angle arbitrarily, otherwise the core diameter of the worm goes to zero.
ZAR9: software for cross-helical gear design
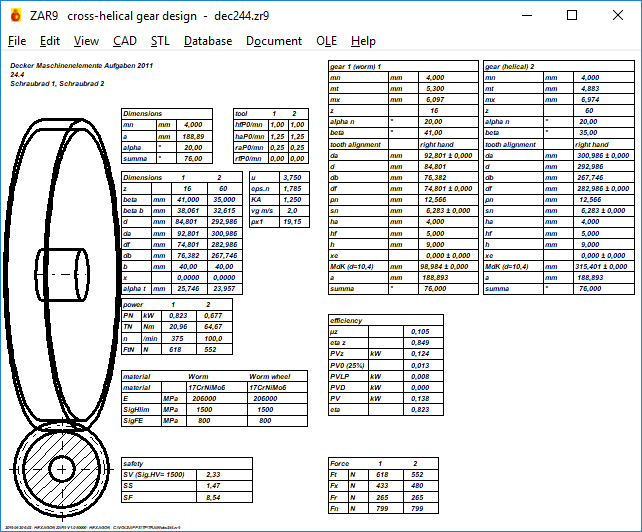
Soon we can provide a new software for cross-helical gear design. The dimensions of cross-helical gears are calculated similarly to worm gears, so that most dimensions for 90 ° axis angles can also be calculated with ZAR3 +. Instead of a line contact like a globoid worm wheel, there is only one point touch on the cross-helical gear. Therefore, in the cross-helical gear compared with a worm gear of the same dimensions, the load capacity is worse and the efficiency similarly poor.
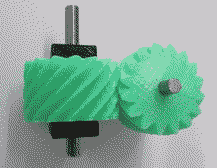
Incidentally, ZAR3 + can also be used to calculate a worm gear that is more similar to a pair of cross-helical gears: enter the same number of teeth z1 and z2 and gamma_m = 45 °, results in the same dimensions of worm and worm wheel. When created with a 3D printer, the worm and worm wheel (as a helical wheel, not as a globoid wheel) are exactly the same.
There are several types of cross-helical gears: worm and helical gear with 90 ° axis angle as worm gear replacement, two cross-helical gear wheels with 90 ° axis angle, or the same with an axis angle between 30 ° and 90 °.
ZAR1+, ZAR3+,ZAR5,67,8,ZARXP, ZAR1W: Settings: z slice

Helical gears and worm gears are shown in layers. The layer thickness can now be configured under File \ Settings \ CAD. We suggest to configure the default layer thickness of your 3D printer as z_slice. Attention: If you reduce the layer thickness so that the STL model is displayed with smaller steps, the size of the STL file increases accordingly. In any case, the STL file of helical gears will be many times larger than that of spur gears. Helical gears and worms from the 3D printer can only be used to a limited extent, depending on the layer thickness, the slope is a step function with larger or smaller steps and corresponding unevenness. File \ Settings \ CAD:
ZAR1W, ZAR1+: xe tolerance
The +/- tolerance of the generating profile shift factor xe had been displayed too large in the gear table. Since tolerance +/- from the mean value, half the value for the tolerance applies.
SR1 / SR1 +: Less warnings for missing database data for temperature dependency
When you enter a working temperature, you sometimes get warnings like "mat_p_re.dbf: material name?". This means that there are no material data for the temperature dependence of yield strength and Young's modulus. There are fields in the database for the values at 100 .. 700 ° C. If the entered working temperature is less than 100 ° C, these warnings will no longer appear in the future because at 100 ° C modulus of elasticity and yield strength change only slightly. The most important influencing factor is anyway the temperature expansion coefficient alphaT, and this one is known for all materials.
GEO4: create model with 3D printer
In addition to cams or cam discs, you can now also create plungers and a carrier plate as STL
file and produce with 3D printer.
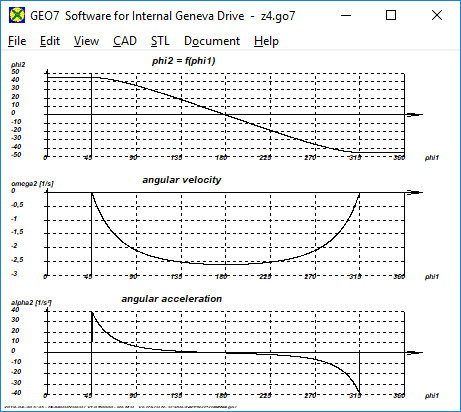
GEO7: Software for Internal Geneva Gears
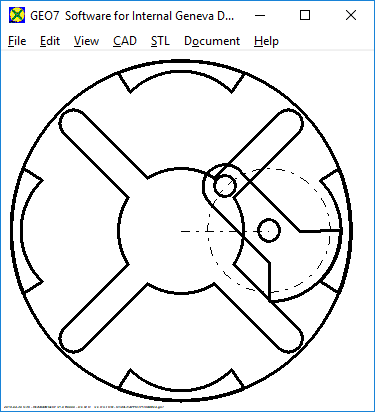
GEO7 calculates stepper gear with internal Geneva wheel. Interior Maltese have a long switching time and a short rest time compared to external Maltese gears. In a 4-beem external Geneva gear, the switching angle is 90 ° and the locking angle is 270 °. In case of an internal Geneva drive, the reverse is true: switching angle 270 ° and locking angle 90 °.
Reverse STL direction
Under "File \ Settings \ CAD" (STL Dir invers) you can now reverse the direction of the STL-3D objects if your program to open the STL files displays the 3D object in the wrong color or reports the wrong direction.

Change Licensee name: 40 Euro
The name of the licensee is fixed in the program and can not be changed by you. For updates, the name of the licensee usually remains unchanged. If you want to change your company name in the program as part of an update, because the name has changed or the company was merged or acquired, please order the name change for a fee of 40 Euros (plus the update price). Otherwise, the name of the licensee will remain unchanged in the new version. Maximum 30 characters are possible.
Key code problem with Windows 10 or network version
If you always need new key codes for your network version if the server or volume has been replaced or volume settings modified, but the path remained the same, you can update to a version with permanent key code, but your program path must also remain permanent. When updating, please specify the network path (UNC path, no logical drive), e.g. \\ourserver659\HEXAGON\, then you get an update with permanent code that does not change anymore (if the path does not change). Then you need new key codes for the last time. License agreement then please also update with UNC path and copy back as a pdf file.
A similar problem exists for single-user licenses under Windows 10. For large Windows updates, Windows reduces the usable size of the hard disk in favor of an invisible Microsoft partition. The only solution is to install the software not on the system partition C:, but on another partition or hard disk. If your PC has an SSD disk and a large hard disk, do not install HEXAGON software on the SSD if Windows is installed there. Better install it on the large disk. Another option is to install HEXAGON software on an external hard drive. Then HEXAGON software remains on the external hard drive, even if computer changes, without needing new key codes.
Did you know ? Show database sorted
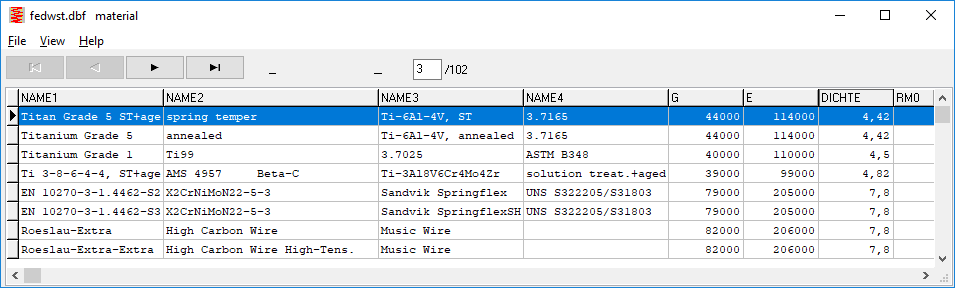
All databases can be sorted by any column by clicking with the right mouse button in the title field (here "DENSITY" or "DICHTE")