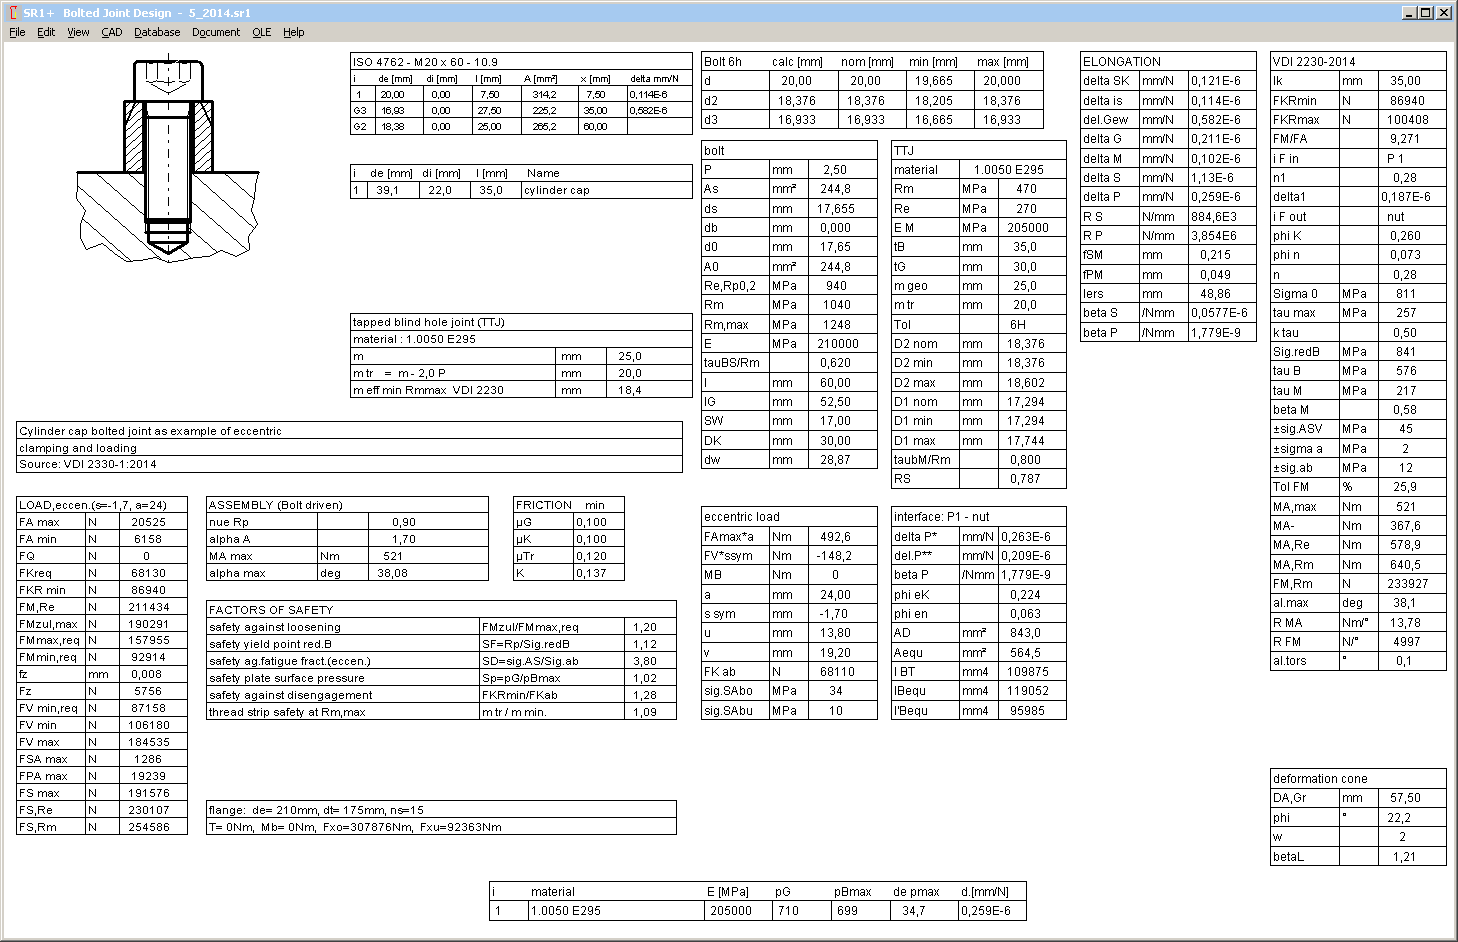
SR1+ Quick3 View
New "Quick3 View" contains all input data and calculation results on one screen.

SR1 – Deformation cone to VDI 2230-1:2014
In the latest version of SR1 you can configure to calculate the elastic resilience by means of deformation cylinders to VDI2230:1986, or by means of deformation cones according to VDI 2230-1:2014. Unfortunately, calculation to VDI 2230-1:2014 assumes that clamping plates of every bolted joint can be treated as one deformation cone. But therefore, outside diameters should be similar, or should increase to a maximum in the middle between bolt head and nut. If this not applies, or E modules of clamping plate materials are not equal, elastic resilience of each clamping plate must be calculated separately. Bearing diameter dw for the upper surface of the next clamping plate is then bearing diameter for the lower side of the previous clamping plate. Formula (52) in VDI 2230-1:2014 is valid only if outside diameter of every clamping plate lies inside of the calculated deformation cone.
For the case that the calculated deformation cone is interrupted by a clamping plate with a small external diameter, SR1 uses a lightly modified formula (46) for clamping plate i:
dwmin = dw or dw of previous or next clamping plate
dwmax = dw + 2 lv(i) * tan (phi), or dw of previous or next clamping plate
tan(phi) = (dwmax-dwmin) / (2*li)
deltapvi = ln ((dwmin+dhi)*(dwmax-dhi)/(dwmin-dhi)*dwmax+dhi)) / (EP*dhi*pi*tan(phi)
VDI 2230-1:2014 makes a difference between TTJ (ESV) and TBJ (DSV) to ease the TTJ calculation with deformation cone and deformation cylinder, this leads to sequential errors. This can be shown in the following example, first as TTJ, and then as TBJ with nut.
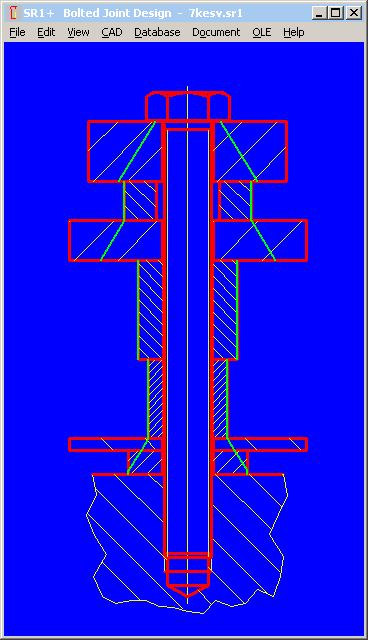
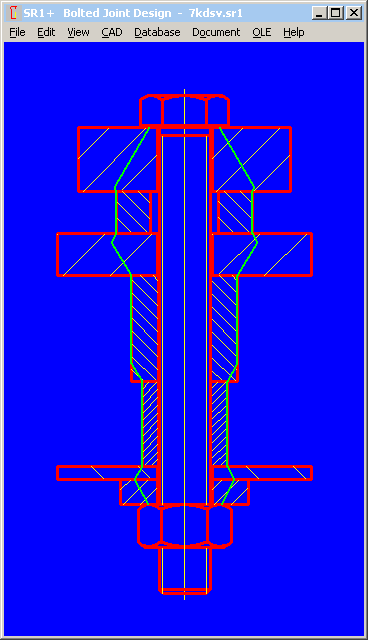
To avoid this error, VDI should define how to calculate a cone for tapped thread, or define a virtual bearing diameter dw for the internal threaded plate.
In SR1, you can configure at "Edit->Calculation Method", if elastic resilience should be calculated with cylindrical deformation bodies according to VDI 2230:1986, or with deformation cones according to VDI 2230-1:2014. For the present, old calculation with deformation cylinders is set as default method. You can change default settings by saving your individual default values in a file with file name "NULL". If a NULL.SR1 file exists, it will be loaded automatically when running SR1.
SR1 – Bending Moment MB
At "Eccentric Application", an additional bending moment can be entered. As defined in VDI2230-1:2014, additional to bending moment FA * a. MB is always static, and can be with positive or negative value.
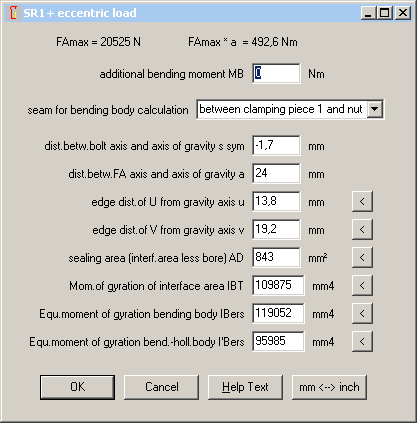
SR1+ New diagram p = f (x) for eccentric load
Distribution of pressure along the interface (according to figure 25 in VDI 2230-1:2014) can be displayed as diagram in SR1+.
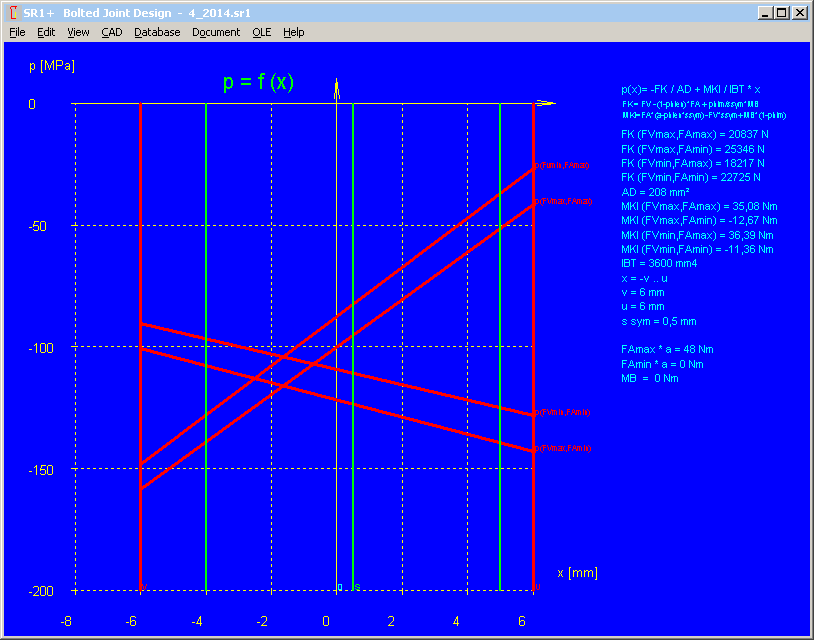
Interface between the eccentric loaded clamping plates begins at U and ends at V. "0" is center line (if symmetric) or center of gravity of the interface section. "S" is the center line of the bolt. If FAmax = FAmin, bending load is static, and the diagram shows two curves p (FVmax) and p(FVmin). For alphaA=1 (without tolerances) there is only one curve. Else, the diagram shows four curves: pressure for FAmax and FAmin with FVmin and FVmax.
SR1 – TTJ, TBJ, and "TTJ + dw"
In application example B1 of VDI 2230:2014, deformation cone is calculated as TTJ (through bolted joint with bearing diameter of a nut), but the elastic resilience of the inner thread is calculated as TTJ (tapped thread joint). So, a new bolt-nut type "TTJ + dw" has been defined in SR1 for to calculate this case, a tapped blind hole joint with bearing diameter.

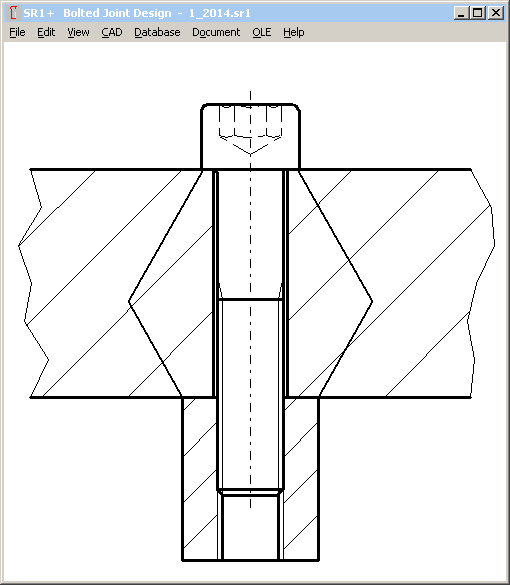
Application example 3 VDI 2230 should be calculated in the same manner, but merely a simple TTJ was used there.
SR1 – Special head database for studs
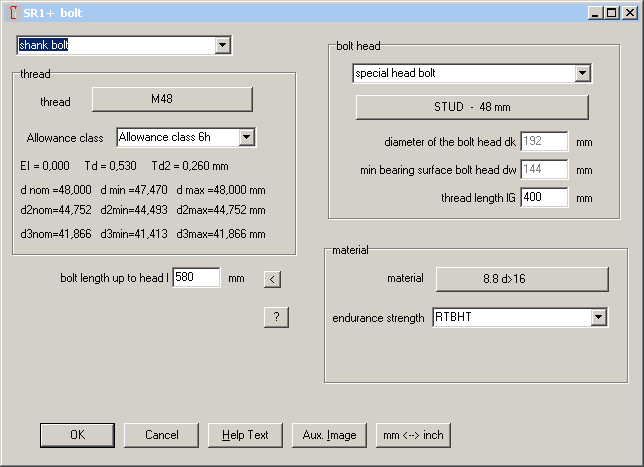
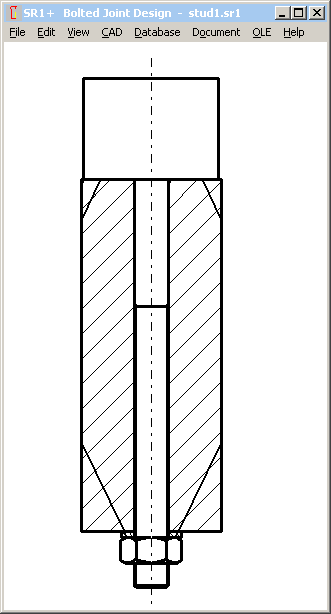
If you selected "special bolt head" in the past, maybe you got a message "D=xx not found – Append dbf", and you first had to define the bolt head data in the "sondkopf" database. Now, for all thread sizes a "special bolt head" was defined with head height h =3d, external diameter de=4d, and bearing diameter dw=3d. Such a bolt head can be used if a stud instead of a bolt should be calculated. In this case, bolt head is assumed as body with screwed-in stud.
SR1 – Interface for eccentric load between clamping plate and nut
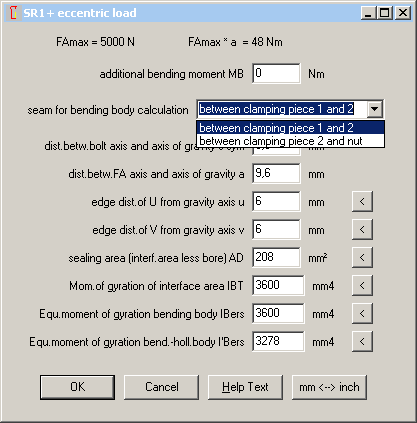
In the past, interface had to be selected between two clamping plates. Now, you can also select the bending interface between the last clamping plate and the plate with the internal thread.
SR1 – Special Nut
Until now, self-defined nuts were defined by nut height and bearing diameter dw (which was also used as external diameter). For a more realistic drawing, you can now also define an external diameter de (which can be width across flats, too).

SR1 – Friction Input with Database according to VDI2230:2014

Min and max values of the friction coefficients can be selected from a new database with friction classes according to VDI 2230-1:2014.
SR1 - Tightening Procedure with database according to VDI2230:2014
Tightening coefficient alphaA and reduction coefficient k tau together with tightening procedure and adjustment procedure can be loaded from the actualized database according to VDI 2230-1:2014.

SR1 – Safety against shearing and bolt bearing pressure if radial load FQ
Because safety against shearing and bolt bearing pressure is listed in VDI 2230-1:2014, safety factors SA and SL have been added to SR1, too. Even though shearing by radial load cannot occur, if safety factor SG is higher than 1.
Similar for safety factor SL: because radial load is transferred by friction, a safety factor SL smaller than 1 maybe is no severe problem, if safety factor SG against slipping is higher than 1.
SR1 - Thread database
Row-2 and row-3 sizes added (M9, M11, M45, M52, M60, M68, M52x3, M39x3, M45x3 etc.)
SR1 – Database Hexagon Head Bolt
Fine thread bolts ISO 8676 and ISO 8765 added.
SR1 – Tension-Elongation Diagram

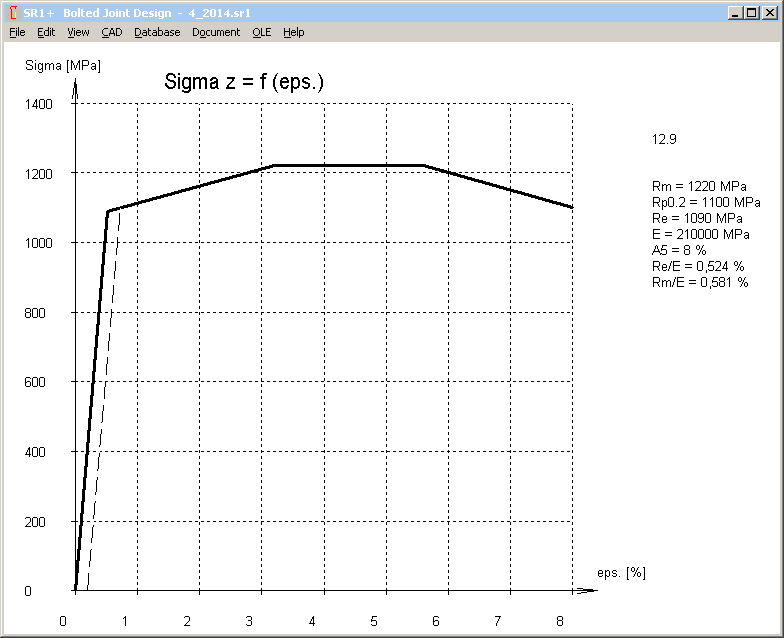
Elongation at fracture (A5) had been added in the mat_bolt database with bolt materials. Elongation at fracture together with modulus of elasticity, tensile strength and yield point can be used to design a stress-elongation diagram for the bolt material. Hypotheses:
Heat-treated steel, elastic elongation until yield point, then linear increase of stress until tensile strength and plastic elongation until 40 per cent of A5, then further elongation at tensile strength until 70% of A5, then further elongation until A5 with decrease of stress until yield point.
F-alpha, M-alpha Diagram for over-elastic tightening
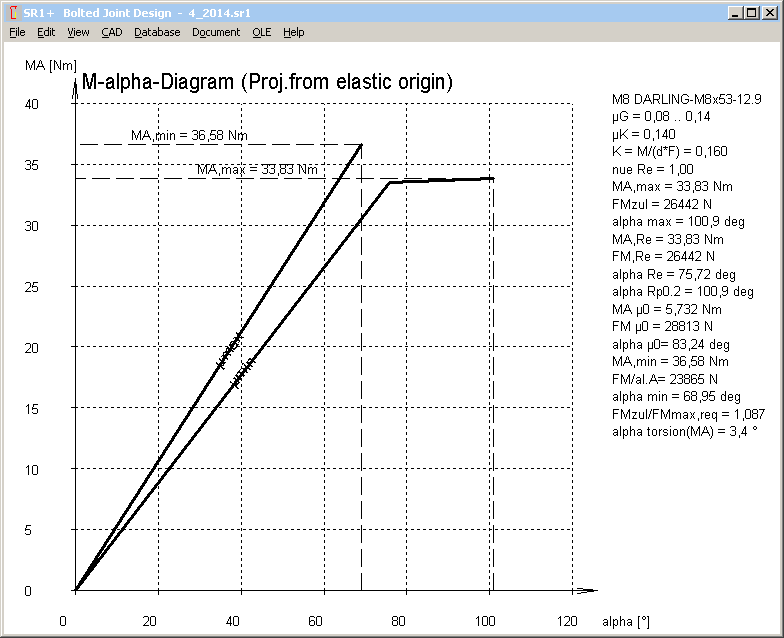
Tightening angle for clamp load and tightening torque beyond yield point can be calculated from the stress-elongation diagram of the bolt material. If a yield point factor nueRe of 1.0 or higher was defined, F-alpha diagram and M-alpha diagram now consider torque angle beyond yield point.
Here you can see that plastic deformation grows much higher than elastic deformation. Module of plasticity can be calculated as
P module = (Rm-Re)/(0.4 * A5 % / 100% - Re / E-Module)
In the example shown, P module is only 0.02 of E module.
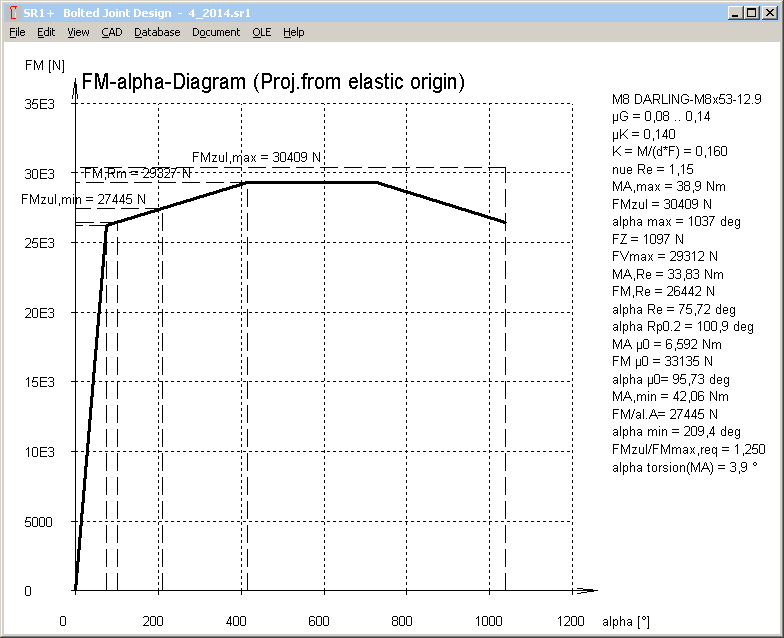
In the example with nueRe=1.15 (only 15% beyond yield point), yield point is reached at a torque angle of 75 degrees. Further tightening until 400 deg increases the clamp load by only 10 per cent. Then you can tighten without increasing torque, and finally the bolt breaks at a tightening angle of 1000 degrees.
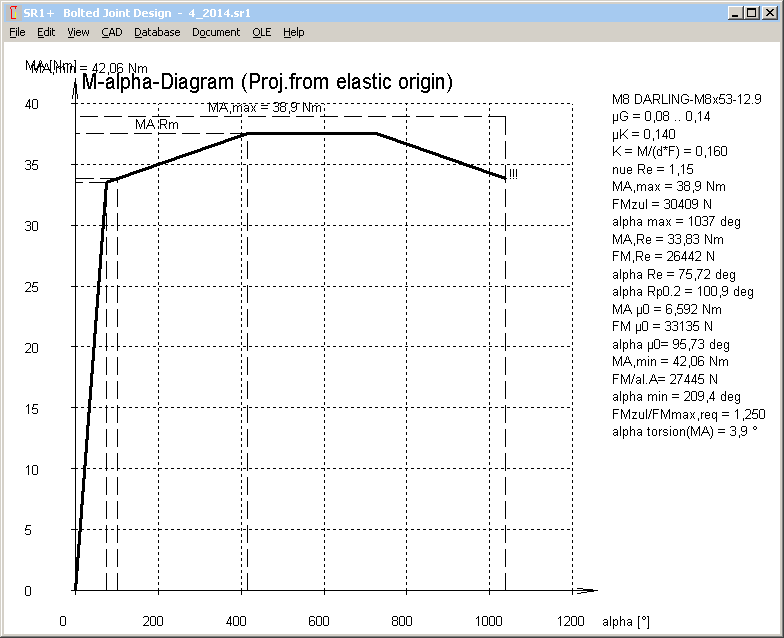
At over-elastic tightening, yield point should be overridden as little as possible. Already the 0.2 per cent plastic deformation at Rp0.2 corresponds in the example to 20 degrees tightening angle. For torque-and-angle-controlled tightening, this may be sufficient to recognize the yield point and stop tightening process. If dynamic load, sum of FVmax+FSA must not override the yield point, else bolt would be elongated with every load cycle until fracture.
VDI 2230-1:2014 increases pressure between clamping plates because of yield point tolerance (+25%) to pmax = FMTab/Apmin*1.4 (R10/3) (with FMTab = RM,Re*0.9)
In SR1, we use another method with the same result: If a yield point factor nueRe >= 1 was defined, you get a warning if safety Sp = pG/pBmax is less than 1.25.
Mistakes and errors in VDI 2230-1:2014 (continuation of Info 148)
New VDI 2230 contains so many mistakes that it would require too much space to describe all in this info letter. So all of the mistakes, together with my comments, are described on separate pages:
www.hexagon.de/rs/vdi2230e.htm
The VDI did not publish correction pages until now. My inquiry remained unanswered.
Modulus of elasticity of bolt material
All application examples in VDI 2230-1:2014 are calulated with an E module of 205 000 MPa. But the E module of 8.8, 10.9 and 12.9 is 210000 MPa at 20°C. If you recalculate the application examples with SR1 and compare the results, this difference has to be considered.
Pg. 11: I, IB, Ibers, IBT ..
Translation error: Flächenträgheitsmoment = area moment of inertia (not moment of gyration)
Pg. 36 (R9/1):
Stress area of Sigma a is A0 instead of AS (at least for necked-down bolts and hollow bolts).
Pg. 50, 51, 52
Bending body must be calculated from the real geometry (prismatic), not from a virtual deformation body (cylinder and cone) of the bolted joint.
Pg. 67 Equation (98): phim* = n * ...
Load introduction coefficient of axial load FA must not be used with MB.
Pg. 88 (149)
Cit.: SigmaZ = 1/A0*(FMzul + FSAmax – delta FVth) + MSbmax/Wb
For eccentric load, bending stress by MB has to be added. And for operating state, FMzul can be replaced by FVmax.
Centric: SigmaZ = max(FMzul/A0, 1/A0*(FVmax + FSAmax – delta FVth)
Eccentric: SigmaZ = max(FMzul/A0, 1/A0*(FVmax – delta FVth) + SigmaSAb
Remark: FSAmax/A0 and Msbmax/Wb is included in SigmaSab. And equation (186) has to be modified, so that external bending moments MB are considered., see Pg.95.
Pg. 88: (150):
Equation (150) is redundant, equation (149) is sufficient.
Pg. 90,91: FV1
Clamp Load FV1 calculated with equation (161) is higher than permissible assembly preload FMzul.
Pg. 95 (186)
Bending moment MB is not considered in Sigma Sab calculation.
And stress in the weakest area (with A0 and Wb0 instead of AS and WS) should be calculated (concerns hollow bolts and waisted bolts)
Equation (186) with bending moment FA*a and bending moment MB should be:
Sigma Sab = phien*FA/A0 + ßP/ßS*(FA*a – FA*ssym*phien + MB(1-sign(ssym)phim)/Wb0
Pg. 96 (187, 188, 189)
Equations (187), (188), (189) are redundant.
VDI 2230-1:2014: Pg.144: Example B3:
delta i = (l1+l2+l3)/ES/(A0-ABore)
A0 wrong, because of different diameters d1,d2,d3
Pg.147: Example B3: R11 Length of engagement
Equation used for calculation of RS is valid for equal shear stress coefficients of bolt material and nut material only. But tauBS/Rm of 8.8 is 0.65 and tauBM/Rm of 16MnCr5 is 0.85 according to VDI2230-1:2014 tables. Calculated RS is then 2.0, and not 1.52.
Pg.148: Example B3: R11 Length of engagement
Cit.: "while this applies to the hollow bolt: Rmmax*AS = FMzul"
What? Rm,max*AS = FMzul ? Why?
For hollow bolts, use A0 instead of AS, but not FMzul.
Rm,max * A0 = 830 N/mm˛ * 1.2 * 251 mm˛ = 250 kN
That is approx. twice as FM zul.
Calculated length of engagement is then 4.85 mm only, plus mzu=2.4mm
Here the correct results:
meffmin = 8,0mm (instead of 4,8mm) with Rmmax*A0=250Nm and C2=1.16 from RS=2.0
mgesmin = meffmin + mzu = 8 + 1.2*2 = 10.4 mm
Why is mzu 1.2 P only? Normally, it is 2.0 P.
Pg.149: Example B4: Initial conditions
Cit: "Cq 45 heat treated to a tensile strength of 900 N/mm˛"
Cq45 cannot be heat-treated to 900 N/mm˛. +QT: 700-850 N/mm˛ for t<8mm
Pg.150: Example B4: R1: Determining the tightening factor alphaA
Cit.: The bolt is tightened using the angle-controlled tightening technique. According to table A8, the tightening factor is alphaA=1.
Right: According to table A8, the tightening factor alphaA is between 1.2 and 1.4.
alphaA=1 is a theoretical ideal case without scatter nor friction tolerance.
Pg.155: Example B4: R8:
FV1 = 31 467 N
Then the clamp load following initial loading is higher than permissible assembly clamp load FMzul = 26 444 N!
Pg.156: Example B4: R8:
Cit.: The BJ satisfies the requirements.
But working stress sigma red,B should be calculated in R8, and not the remaining clamp load!
Sigma0 = FMzul/A0 + SigmaSabmax = 26442 / 26.6 + 61 = 1055 N/mm˛
taumax = MG/Wp = 363 N/mm˛
Sigma red,B = 1102 N/mm˛ (with ktau=0.5)
SF = Rp0.2 / Sigma red,B = 1100 / 1102 = 0.998
Pg. 157: Example B4: R9:
SigmaSAbo: For maximum bending stress in the weakest cross-section, dS = 6.827 mm must be replaced by dT= 5.82 mm, and AS must be replaced with A0=pi/4*dT˛.
Sigma SAbo is then 62 N/mm˛
VDI 2230-1:2014: Pg. 162: Example B5:
Recalculation: ssym is +1.98 mm, and not –1.7 mm. Even in figure B7, ssym is positive.
"Check for the sign rule according to table 4" corresponds to case I, and not to case III.
ssym is the distance between center of gravity axis and bolt axis. GEO1+ software may be used to calculate center of gravity and ssym.

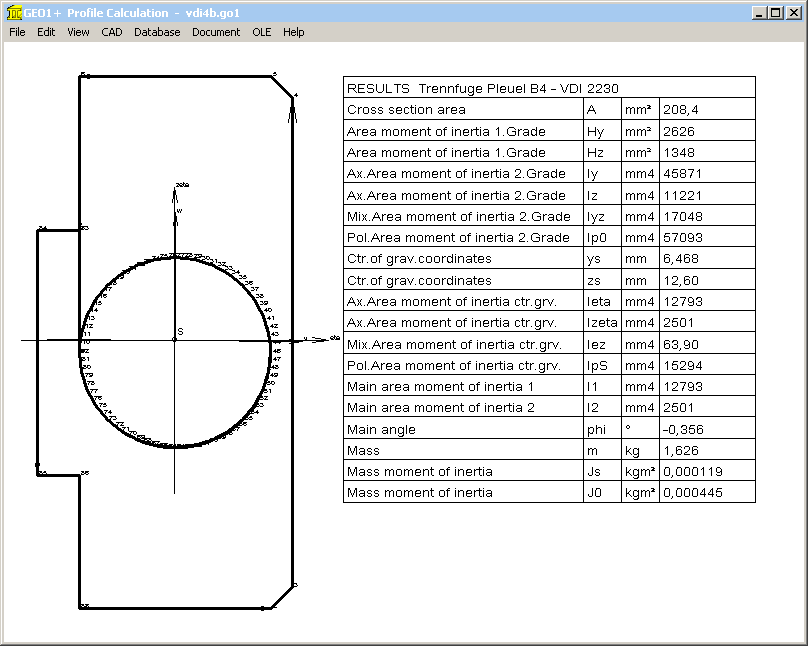
With coordinates of interface area are ri=72mm, re=105mm, alpha = 24°, rS=87.5mm and dh=22mm, GEO1+ calculates ys=89.48 mm. Thus ssym = ys – rS = 89.48-87.5 = 1.98 mm, u = ys – ri = 89.48-72=17.48 mm, and v = re - ys = 15.48 mm.
Area moment of inertia at w axis is Izeta= IBT = 95985 mm^4.
Pg. 168: R8
Cit.: sigma zmax = FSmax/AS = 780.3 N/mm˛
Comment: Bending stress by eccentric load not considered
Correct: Sigma zmax = FMzul / As + Sigma Sab = 190000/245 + 35,6 = 811 N/mm˛
Sigma red,B = 841 N/mm˛
SF = 1,12
GEO1+, TR1 – Sector of circle and sector of annulus with or without bore
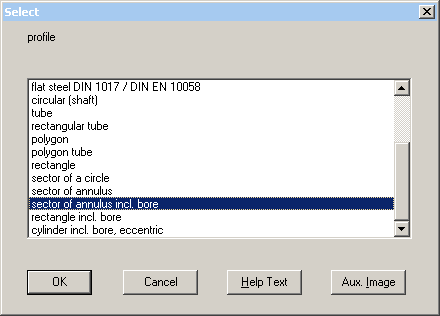
GEO1 software is a good tool to calculate interface section and section of bending body of eccentric loaded bolted joints. But the input of coordinates was inconvenient for the annulus sector of VDI 2230 example B5. Therefore, sector of circle and sector of annulus has been added to the predefined profiles, so that you can define the geometry of the cross section now by input of external and inner diameter, arc angle, bore diameter and pitch-circle diameter. Other new predefined profiles are "rectangle with hole" and "circle with eccentric hole" to calculate interface sections of prismatic and cylindrical clamping plates of bolted joints. Pre-defined profiles are available in GEO1+ only, not in GEO1. We will no longer provide GEO1, only GEO1+ with profile databases and pre-defined profiles is available in future.
FED1+ Increased coil diameter De1 and De2
A new column with external coil diameters De1, De2, Dec has been added to the table with spring loads and dimensions at position 0,1,2,n,c. Because the formula for deltaDe in EN 13906 calculates increase of coil diameter on block length Lc only, a formula with variable spring length Lx had to be developed:
DeltaDe = sqrt(D˛+(P0˛-Px˛)/pi˛) – D
With pitch Px = (Lx-Lc)/n + d and P0 = (L0-Lc)/n + d
x = 0,1,2,n,c
Pc (pitch at block length) = d
To verify the results, one could calculate coil diameter from wire length:
D = Lwire / (nt * pi)
The value is a bit smaller than to the previous formula, because the end coils are calculated with increased coil diameter, too.
Compared with the results of the EN 13906 formula, new value for Dec in FED1+ is always lower than De+deltaDe to EN 13906, maybe due to a safety margin. Therefore, both values are listed now in FED1+ (until further advice): Dec according to EN 13906, and De1, De2, Den and Dec in the table according to new formula.

FED1+, 2+, 3+, 5, 6. 7, 8, 9, 11: Spring Material UGI 4362 (1.4362 / X2CrNiN23-4)
New material has been added to fedwst.dbf database (No.88). Data according to data sheet UGI 4362. Properties: tensile strength as 1.4310-HS, corrosion-resistant as 1.4401.

ZAR3+ Tool Profile
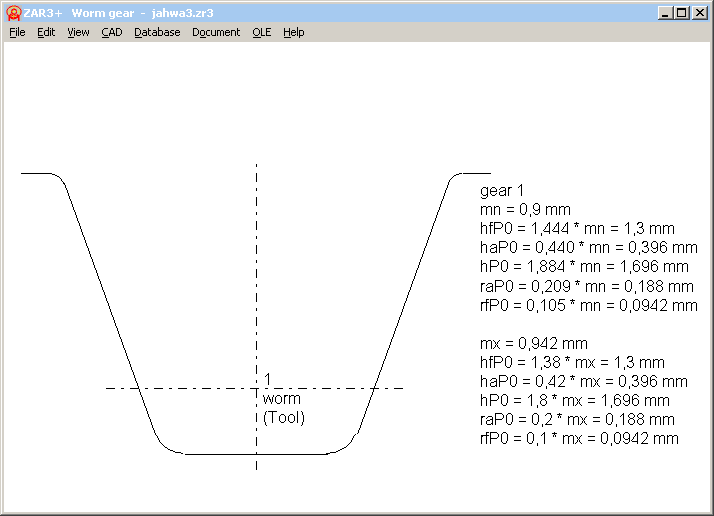
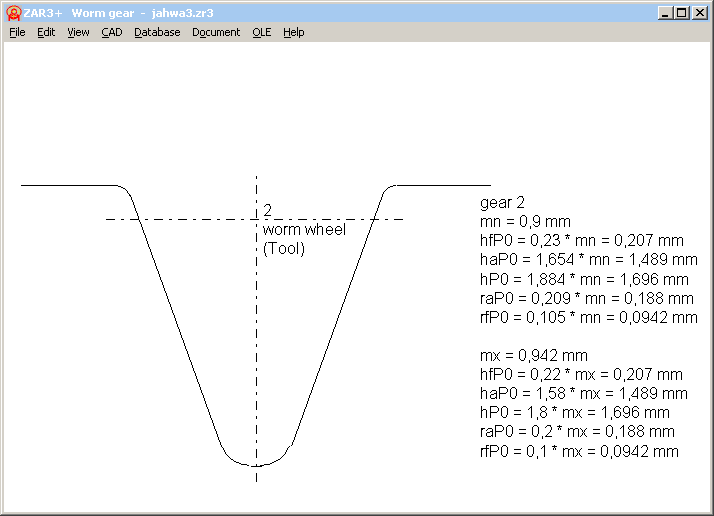
Reference profile of the tool can now be drawn on screen, or exported at "CAD".
ZAR3+ Tooth height coefficients and complementary gear pairs
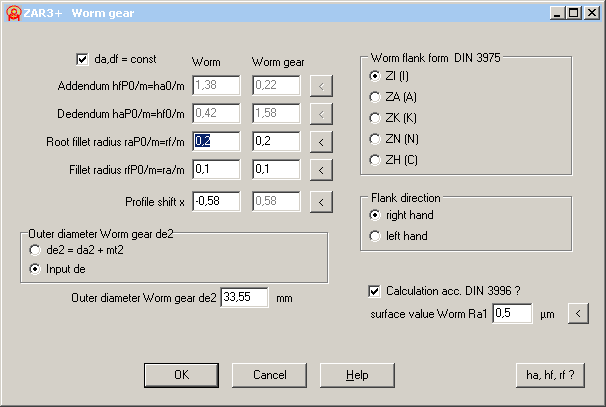
At "Edit->Production", a fillet radius at tip diameter (=root fillet at tool) had been added.
And if you set "da,df = const", you can only input x1. Profile shift x2 is set -x1, so that tip diameter and root diameter remain unchanged, and tooth height factors are calculated accordingly.
For a complementary gear pair with thin worm teeth and thick teeth of the worm wheel, profile shift of the worm is negative, and positive for worm wheel.
HEXAGON Software in Command line mode – Application example SR1
Vossloh Locomotives GmbH uses SR1+ for verification of bolted joints according to VDI 2230. By use of SR1+ in command line mode, calculations of bolted joints with many different load cases can realized more efficiently. First clamping plates, bolt and nut are defined in SR1+. Then, variable data (loads, load positions, friction coefficients.. ) are provided by an Excel table, SR1+ executed in command line mode by Excel, and results loaded from text file.