English
Deutsch
TORQUE-ANGLE SIGNATURE ANALYSIS
...A practical method for verifying the tightness of critical fasteners.
by:
Ralph S. Shoberg
President & Technical Director
R S Technologies, Ltd.
37428 Hills Tech Drive
Farmington Hills, MI 48331
Hand torque audits are conducted to verify the amount of torque which has been applied to a fastener. However, it is actually the tension or clamp force that determines whether the fastener has been properly tightened. Factors such as cross threading can indicate a sufficiently high torque level while the clamp force is well below requirements.
A method of tightness verification called torque-angle signature analysis now provides a very practical and powerful technique for evaluating the actual clamp force achieved by a fastener installation process. Examining the torque-angle signature of a fastener basically means looking at tightening and loosening curves, or plots of torque versus angle as the fastener is installed/uninstalled. These curves are studied initially in the elastic tightening region where the fastener has not gone beyond yield.

Tightening Curve
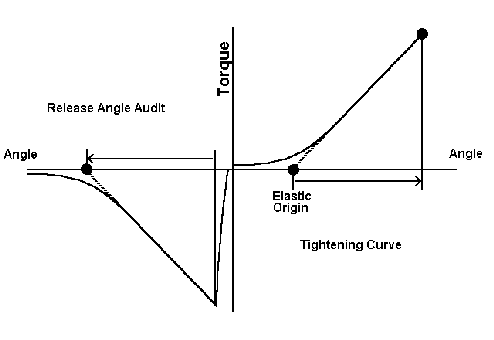
The typical torque-angle tightening curve consists first of an aligning zone, which is a nonlinear or curved portion, where the fastener aligns parts and draws them together. Next is the elastic clamping zone, where the joint has been stabilized, the parts have been drawn together, and the fastener is snugging up the joint. This portion of the curve is a straight line or constant slope (Figure 1).
How does one know when a fastener has been snugged up? When the joint has been torqued enough to get beyond the aligning zone so that it is in the elastic clamping zone.
Elastic Origin
Once torquing has been stopped in the elastic clamping zone, a line tangent to the straight line portion of the curve can be projected backwards. The point where the projection line strikes zero torque, if there is no prevailing torque, is called the elastic origin. If the angle of turn is measured from the elastic origin to the point where torquing was stopped in the elastic clamping zone, it will be found that the tension on the joint is directly proportional to that angle of turn.
What is happening is that compression of the parts and stretching of the fastener is occurring in a linear fashion from the projected elastic origin. Even if friction on the threads or the underhead region of the fastener is varied, it still will be found that within the elastic region the tension generated is always proportional to the angle of turn from the elastic origin.
When studying a fastener where there is prevailing torque in the initial rundown, the line projected back along the elastic curve must stop at the prevailing level and the elastic origin will be set there rather than at zero torque. Then the tightening angle is from this elastic origin to the point where tightening was stopped in the elastic region.

Loosening Curve
When a fastener is loosened, a torque-angle loosening curve can be plotted which is a reverse of the tightening curve (Figure 1, left). This is also called a release angle audit or release angle method of tightness verification. A line is projected tangent to the elastic release portion of the cure and taken to zero torque, locating the elastic origin. The release angle, ascertained from the point where loosening starts to the projected elastic origin, is a direct measure of the tension released from the joint.
Experiments with strain gage bolts or force washers where the clamp force is measured along with the torque and angle during tightening will verify that this theory is correct for any given fastener. To apply torque-angle signature analysis, a torque-angle transient recorder is used for curve measurement and plotting. The transient recorder can provide curves on-screen for analysis as well as print them out for detailed study. Tightening, audit and release angle signatures for a given fastener can be simultaneously displayed and printed.
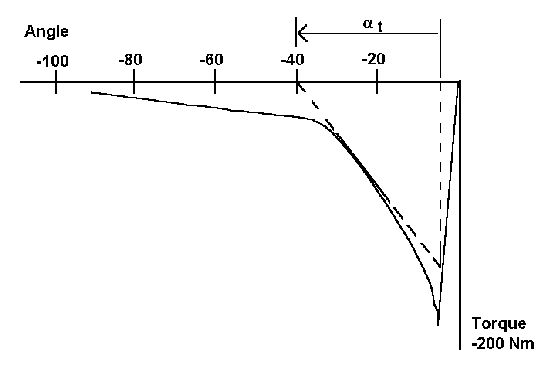
Figure 2 shows a release angle study performed on an automotive wheel nut. A tool with a torque and angle sensor that is connected to the transient recorder is utilized to loosen the nut, record the torque and angle values, and plot the data. The resulting printed curve shows an extremely high release torque. Applying the release angle method, a line is projected tangent to the elastic release portion of the curve to zero torque. This release angle, measured from the release torque point to the point where the tangent line crosses, is directly proportional to the tension or clamp force
released.
Beyond Yield
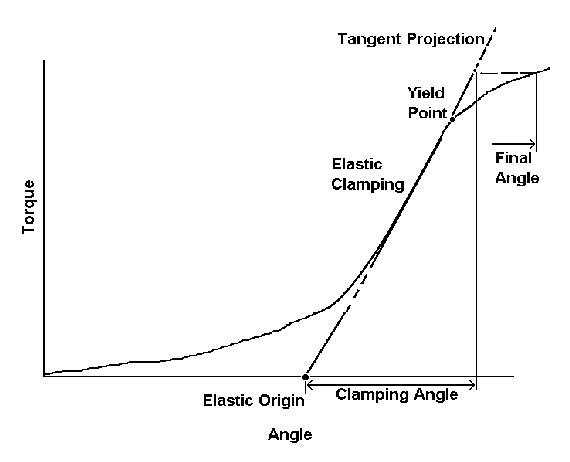
When a fastener is taken beyond the yield point, the torque angle signature method is used to find the elastic origin, project a line along the elastic curve above the yield point, then project the maximum torque level back to that line. The added tension after yield is the amount of angle relative to the straight line elastic clamping portion to that maximum torque point and is not proportional to the overall angle of turn (Figure 3).
When performing a release angle audit on a fastener beyond yield, a similar projection of the elastic curve is done.
Loosening Tendencies
The release angle method has been successfully used to study fastener loosening tendencies. In this application the torque-angle tightening curve is first plotted, the elastic origin is located, and the amount of angle of turn from the elastic origin is determined. After the assembly has been allowed to relax (for example to sit overnight or run on a hot test) the fastener is loosened and the loosening curve is studied. The release angle is determined, compared to the tightening angle, and if not equal, evaluated to see how much tension was lost by relaxation or loosening.
In one release angle study, a part had a tightening angle of 120 degrees. Once the part sat overnight, the release angle was 20 degrees. The vendor was already aware there was a major problem because the parts were falling apart.
The study showed that relaxation in the threads was causing an approximately 80% loss in clamp force over a 12 hour period. The release angle method provided a quantitative answer as to how much clamp force was being lost and clearly showed that there had to be a redesign of the parts.
The release angle method is also valuable for studying short grip length fasteners holding composite or plastic parts. Here, a torque-angle signature curve for tightening is produced, then parts can be put in an environmental chamber and temperature cycled, followed by a release angle study. Looking at the release angle curve would indicate amount of clamp load loss due to embedment of the fastener into the plastic part under temperature. By changing geometrics and washer size, the effects can be quantitatively measured and compared.

Accurate Measurement
Torque-angle signature analysis is especially useful for studying critical fastener assemblies (critical in terms of safety or reliability) such as automobile, truck, aerospace, process industry, and other industrial applications. In the hands of a skilled operator, these studies can be accurate to 5% or better.
In addition to analyzing fastener problems such as loosening and embedment, torque-angle signature analysis can also be used to evaluate the performance of tightening tools in applying the desired clamp force on fasteners. This technique is particularly applicable for evaluating pulse tools and impact tools.
Pulse and impact tools move fasteners at high speeds with a great deal of stick-slip, chatter, and unique frictional characteristics that are not seen with steady, continuous tightening processes. These factors can lead to a deceptively high torque reading but with minimal clamp force created. By checking the assembled joint with a release angle study, the user can assure that an adequate angle of turn, and thus proper clamp force, is being achieved.
Clearly this method of audit provides a direct measure of the capability of a given tool to develop tension in the tightened fastener. The results of release angle audits being directly related to the tension achieved are significantly more meaningful than the information gained from breakaway torque audits.
Conclusion
The torque-angle signature method of analysis is plain, simple, and straightforward. It is grounded in the basic physics of tightening a bolted joint. The technique can be applied to fasteners of all sizes and all grip lengths. While there may be 75 to 100 factors which affect the tightness of a given bolted joint, the torque-angle signature analysis method provides for direct verification of clamp force to assure a quality fastener assembly.
